Sudah dicoba n worked ya gan di lenovo s20-30
Pertama bikin usb bootablenya dulu bisa pake rufus
Terus ikutin step dibawah ini
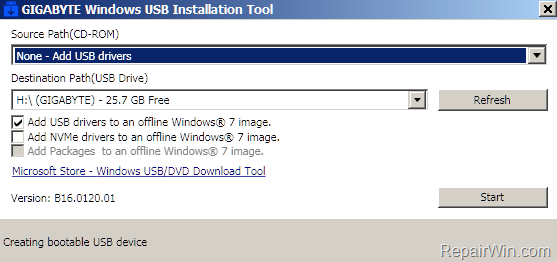
Add USB 3.0 drivers to your Windows USB Media by using Gigabyte's Windows USB Installation Tool.
The second method to resolve the "Select the driver to be installed" error, is to add USB 3.0 support (drivers) to your Windows 7 installation media.*
* Note: The process requires to have access to another working computer with Windows 8.1 or Windows 10 OS. Use this method if your computer doesn't have USB 2.0 ports or if you cannot install Windows by using a Windows DVD media.
Step 2. Download the Windows USB Installation Tool.
1. Navigate to Gigabyte's Support Site.
2. At the search box type "Windows USB Installation Tool" (without quotes).
3. Download the corresponding 'Windows USB Installation Tool' according to your motherboard series.
4. Unzip the downloaded file and then continue to next step.
Gw disini pilih windows USB installation yg intel 100/200
Windows USB Installation Tool (Note) Support Intel 100/200/X299 series motherboards.
Version :B16.1102.1
OS :Windows 7 32bit,Windows 7 64bit
Step 3. Add USB 3.0/3.1 Driver Support to Windows 7 USB.
1. Plug the Windows USB Installation Media on the computer.
2. From the extracted folder, double click to run the "WindowsImageTool.exe" application.
3. Now perform the following:
Select None-Add USB drivers in Source Path.
Choose the Windows 7 USB installation disk in the Destination Path.
Finally click Start.
When the process is completed click Close.
4. Eject the USB drive and use it to install Windows.
The WordPress Audio Player plugin is a compact HTML5 + flash hybrid based WordPress plugin which can be used to play an audio file (.mp3 or .ogg). The audio player is compatible with all major browsers and devices (Android, iPhone).
If you are selling audio files from your site then you can use this plugin to offer a preview
If you do podcasting then this audio player can be used to embed the audio files on WordPress posts or pages
The audio player is compact so it doesn’t take a lot of real estate on your webpage
HTML5 compatible so the audio files embedded with this plugin will play on iOS devices
Audio Player Plugin Screenshot
The following images show how the audio player looks when it is playing and not playing a music file:
The following is a preview of how the audio player looks when using template 1:
When the play button is clicked, the button will change to a pause button allowing users to pause the music playback.
Audio Player Plugin Installation and Usage
Go to the ‘Add New’ plugins screen in your WordPress admin area
Click the ‘upload’ tab
Browse for the plugin file (sc_audio_player.zip)
Click ‘Install Now’ and then activate the plugin
Use the following shortcode to embed an audio file anywhere on your site
Use the optional “volume” parameter in the shortcode to specify a volume level for the audio. You can use a value between 0 – 100 for the volume level. Here is an example shortcode usage: [sc_embed_player volume="50" fileurl="https://www.example.com/wp-content/uploads/my-music/mysong.mp3"] The above will set the volume level of the audio file to 50.
Looping the Sound
Use the “loops” parameter in the audio player shortcode to loop an audio file playback automatically. Here is an example shortcode usage with auto loop: [sc_embed_player loops="true" fileurl="https://www.example.com/wp-content/uploads/my-music/mysong.mp3"]
Specifying Both MP3 and OGG Files for the Audio
Note:You don’t really need to use this option. You can just use the mp3 option and the plugin will make sure that the file is playable in all devices.
You can specify both the files types in the “fileurl” parameter separating them with a “|” character. Here is an example shortcode usage that is specifying both the .mp3 and .ogg version of the audio file: [sc_embed_player loops="true" fileurl="https://www.example.com/my-audio.mp3|https://www.example.com/my-audio.ogg"] The plugin will play the supported file based on the user’s device.
Wrapping Text Around the Audio Player
If you want to wrap some text around the audio player then use the following in the “Text” view of the post/page editor: <p style="display: inline">My Audio: </p>[sc_embed_player fileurl="https://www.example.com/my-music/mysong.mp3"] Alternatively, use the following in the “Text” view of the post/page editor (wrap the audio player shortcode in another CSS class with float): Some example text <div style="float: left;"> [sc_embed_player fileurl="https://www.example.com/my-music/mysong.mp3"] </div>
Audio Player Template 1
A few users have asked us to add a player template that has a seek bar and volume control. Audio player template1 gives you that option:
Use the following shortcode to embed the audio player using template 1:
If you are using a WordPress theme with black background then you may notice a very small white dot below the audio player. Add the following block of CSS code to your theme’s CSS file to get rid of it:
#sm2-container{
bottom: 0px;
}
Adding the Audio Player to a Theme’s Template File
You can also embed the audio player in your theme’s template file. Here is an example code that you can add to your template file:
<?php echo do_shortcode('[sc_embed_player fileurl="URL OF THE MP3 FILE"]'); ?>
Playing Audio on Your Home Page Only
Here is an example code that you can add to your header.php or footer.php template file and it will autoplay the audio file on your home page only:
<?php
if(is_front_page()){
    echo do_shortcode('[sc_embed_player fileurl="URL OF THE MP3 FILE" autoplay="true"]');
}
?>
Change the Player Background Color for Template 1
Add the following CSS code to your theme’s CSS file or via the custom CSS plugin to change the player background color. The following example will change the color to red.
Go to the settings menu of this plugin and check the “Disable Simultaneous Play” option to turn off simultaneous audio file playback option. When this option is used, it will automatically stop the audio file that is currently playing when the visitor plays a new file.
Autoplay is not Working on IOS Devices
IOS devices (iPhone iPad) do not allow you to do autoplay. This is a functionality that Apple prevents on their devices. Nothing we can do in the plugin for this unfortunately.
Hosting Your Audio Files
The most obvious choice is to upload your audio files to your site using WordPress’s media uploader. After you upload the audio file via media uploader, it will give you the URL of the file. You can then use the URL in the shortcode of this audio player plugin.
Alternatively, you can host your audio files on Amazon s3.
You can automate it with Automator. Just drag and drop “Run AppleScript” from left pane. And insert following line:
do shell script "pppd call VPN.YOURSERVER.COM" with administrator privileges
Now save it to Application folder and you can run it as regular app. It will ask you for administrator privileges every time because it runs pppd command. When you run it you can see little gear in you status bar indicating VPN runs and get error prompt any time VPM fails.
Dalam beberapa kasus, embed video Youtube ke situsweb
seringkali terkendala masalah ukuran video yang tidak responsif. Hal ini
menyebabkan tampilan video saat diakses melalui ponsel cerdas menjadi
tidak nyaman dilihat (keluar batas lebar halaman web). Hal seperti ini
kadang mengganggu pembaca.
Berikut adalah contoh tampilan yang tidak responsif:
Frame video tampak keluar dari kontainer
Lalu bagaimana cara mengatasinya? Secara umum, kode embed yang diperoleh dari Youtube adalah markup default yang bisa kita modifikasi tampilannya. Untuk itu, kita hanya perlu menambahkan kode CSS – dengan menambahkan kelas – agar frame video dari Youtube bisa menyesuaikan ukuran kontainer halaman web.
Kode embed Youtube asli:
Hasil tampilan setelah mengedit kode CSS
Saya telah mencoba trik ini pada beberapa theme WordPress dan
berhasil. Namun, tidak menutup kemungkinan trik ini dapat
diimplementasikan ke dalam tampilan web yang lain.
Selamat mencoba.
Assalamualaikum, ane mau sharing sedikit tentang pengalaman ane pasang baru PLN via Online. Lokasi di Kotabaru Jambi.
Jadi ceritanya ane baru beli rumah lelang, walaupun ngomongnya baru beli tapi rumahnya sama sekali ga baru :)
Yah namanya rumah lelang pasti banyak aja masalahnya, wong yang mpunya aja bermasalah makanya bisa sampe dilelang. Dari mulai PBB nunggak, PAM nunggak, sampe yang bikin gedek meteran PLN nya yang udah dicabut, ya karena nunggak juga.
Ok, PBB udah beres, cari-cari dikantor lurah akhirnya ketemu no pbb nya tinggal dibayar deh. PAM mah ga masalah ternyata ada sumur di belakang rumah. Yang terakhir ini yang bikin ruwet no PLN nya ga ketemu. Dicari-cari di dinding, pintu,jendela ga ketemu juga nomornya, tanya tetangga pun juga ga tau.
Untungnya ane ada kenalan instalatir PLN (ga tau untung apa ga sebenernya), akhirnya kami pun janjian untuk langsung survey ke lokasi. Setelah di survey dia bisa bantuin pasang dengan biaya 1,8jt. Ane ok-in aja soalnya cek di website PLN untuk daya 1300 biaya pemasangan sekitar 1.249.000 belum sama biaya SLO dan tetek bengek lainnya.
Beberapa hari kemudian si instalatir nelp, dan katanya rumah itu ada tunggakan listrik sebesar 1.300.000 dan harus dibayar dulu baru bisa dipasang baru. Ane tanya tunggakannya a/n siapa, setelah di infoin namanya, ane coba cek di sertifikat rumah kok ga ada a/n itu ya. Makin takut ane mau bayar takutnya tunggakan orang yg kita bayar, soalnya ga ada surat resminya dan cuma berdasarkan omongan dari si instalatir.
Besoknya ane langsung ke kantor PLN rayon Kota baru, dengan niat mau bayar tunggakan, siapa tau ga perlu bayar pasang baru,hehehe.
Di pintu masuk security seperti biasa melayani customer yang datang, dan ane memberitahu mau bayar tunggakan listrik, dia kemudian menanyakan no pelanggan, dan ane jawab tidak tau, apa bisa di cek dari alamat pak?
Security menjawab agak susah pak, tapi coba saya tanya ke dalam dulu. Tidak berapa lama security keluar dengan orang PLN, sepertinya sih teknisi soalnya bapak2 pake sepatu boot :). Dia pun membawa setumpuk kertas yang berisi daftar-daftar pelanggan yang menunggak. Setelah dicoba dicari-cari berdasarkan alamat ga ketemu juga. Si Bapak pun bingung, ane juga ikut bingung.
Eh ujung-ujungnya si bapak nawarin dia bisa bantu pasang baru tanpa bayar tunggakan, biaya sebesar 1,8jt. Ane pun tanya itu sudah termasuk biaya SLO pak?. Oh Belum SLO bisa diurus sendiri. Ini mah calo setengah-setengah, hehehehe...Karena ga enak ane pun pura-pura tanya no hp buat pengurusannya nanti. Sampe sekarang itu no ga pernah ane telp,hehehehe....
Berbekal kertas yang diberikan security buat pemasangan baru, ane pun nekat mengurus sendiri Pasang Baru. Ini nih kertasnya...
Registrasi via website http://www.pln.co.id/pbpd/
Isi data selengkaaappp mungkin. Untuk cari koordinat rumah yang mau dipasang, bisa pakai aplikasi android untuk melihat koordinat GPS.
Setelah dapat konfirmasi by email, tinggal bayar aja di kantor pos.
Terus bawa bukti pelunasanya dan berkas-berkas yang lain ke kantor PLN dan langsung bilang ke securitynya mau pasang baru, sudah bayar dan tinggal ngasih berkas,hehehe....
Jadi biaya pemasangan baru PLN ane kurang lebih 1,3 jt. Sekarang sih meterannya belum terpasang karena menunggu pihak PLN survey dulu. Ya gpp lah yang penting berkas sudah masuk, tinggal follow up di 123.
Kemarin secara tidak sengaja hardisk internal ane keformat, melayang dah tuh data-data gak penting didalamnya. Alhasil dengan bantuan mbah google ketemu deh nih software.
Setelah dicoba, memang gak semua file balik normal, tapi lumayanlah beberapa data bisa diselamatkan kembali.
Buat yang mw coba ga ada ruginya ngetes software ini. Scan hardisknya juga ga terlalu lama.
Jadi ceritanya ane mw jual akun COC ane TH 11, "LAPAK LIAT DISINI", tapi berhubung banyak bgt yg mw tipu-tipu ane bikin aja list contactnya, supaya temen-temen bisa lebih hati-hati lagi.
Ngaku orang Jambi a/n Arief jl.walisongo kel. Kenali besar
BBM: 5FC1C691
N.hp: 082274928065
FB: https://www.facebook.com/bangwayu11
Ngaku orang Jambi a/n Riska tinggal di Komplek Tirta 1 blok B Kotabaru (Padahal ga ada komplek tirta di Kotabaru :p )
BBM: D261DB72
07:27 - riska: Mas masi ada coc nya
07:27 - riska: Di mana posisi skrang
07:28 - riska: Adek saya minat coc mas
07:28 - indowebstershare: Masih
07:28 - indowebstershare: Di jambi
07:28 - riska: Ok mas
07:28 - riska: Bisa kurang lagi mas
07:28 - riska: Coba kirim ss mas biar tak sala beli
07:29 - indowebstershare: Situ lokasi d
07:29 - riska: Bisa mas??
07:29 - indowebstershare: Dmn?
07:29 - riska: Jambi mas
07:29 - riska: Komplek tirta
07:30 - riska: Tau kan mas
07:30 - riska: Klu apa alamat mas ajh kirim
07:30 - riska: Jumpa di rmh mas
07:30 - riska: Ntar saya sama ayah saya.
07:30 - riska: Krmh mas.
07:31 - indowebstershare: Ok
07:31 - riska: Ss nya mas
07:31 - riska: Bisa kurang kan mas???
07:38 - indowebstershare: Bisa nawarnya brp?
07:38 - indowebstershare: Kompel tirta yg mananya ya? Ada 2
07:38 - riska: Mas dlu la brapa kurang nya ntar saya kurangi lgi
07:38 - riska: Iya mas
07:38 - indowebstershare: 1,5
07:38 - riska: Tau nya emas
07:39 - riska: 1,2 la mas
07:39 - riska: Coba ss nya mas biar g sala
07:39 - riska: Tirta 1 saya mas
07:39 - riska: Blok b
07:39 - riska: Mas krmh ajh gimana??
07:39 - indowebstershare: Ooo yg di daerah kotabaru ya?
07:39 - riska: Tau kan?
07:40 - riska: Iya mas
07:40 - indowebstershare: Ada ktpnya?
07:41 - riska: Atau saya ajh krmh mas biar ada apa² akun nya tahu rmh mas gmn bole?
07:42 - indowebstershare: Ok
07:43 - indowebstershare: Sy di perumnas sebelah polsek jelutung
07:44 - riska: Saya g tau ayah saya mungkin tau mas
07:44 - riska: Ss nya mana mas??
07:45 - indowebstershare: Coc th 11, def max th10
http://olx.co.id/iklan/coc-th-11-def-max-th10-IDiZZ4K.html
07:47 - riska: Brapa kurang nya mas
07:47 - indowebstershare: 1,2
07:48 - riska: Mas itu g ada sangkut di hp lain kan pasti.
07:48 - riska: Data masi lengkap mas
07:49 - indowebstershare: Dak ado
07:49 - riska: Saya blajar dri teman saya yg ke tipu heheheh
07:49 - indowebstershare: Ktemu be lgsg dikantor sayo di polsek jelutung
07:49 - riska: Data coc nya mas
07:49 - indowebstershare: Sayo dinas dipolsek
07:49 - riska: Itu ios apa android
07:49 - indowebstershare: Android
07:49 - riska: Pencapaian nya komplit kan mas
07:50 - riska: Tersave dri awal main
07:50 - indowebstershare: Ya
07:50 - indowebstershare: Lgsg ktemu be klo nak nengok
07:51 - indowebstershare: Cemano?
07:52 - riska: Ntar saya tnya² teman dlu.
07:53 - indowebstershare: Sayo adolah di polsek jelutung ni, biaso ngurusin cybercrime
07:54 - riska: Ok mas
07:54 - riska: Ntar saya tnya teman dlu soal game itu
07:54 - riska: Soal nya saya g ngerti juga
07:54 - riska: Itu saya bli buat adek.
07:55 - indowebstershare: Siap
Bagi agan-agan yang pernah ngalamin laptop acernya ga bisa booting, dan ada tulisan default boot device missing or boot failed. Maka mungkin berikut ini salah satu solusinya.
Sudah ane praktekin di salah satu laptop acer temen ane yang bermasalah dan it works!!
Restoring the bios settings to default. (pencet f2 pas booting awal dan di bios setting pilih load saved default)
Changing bios settings: uefi to legacy. (Ubah di bios setting dari uefi ke Legacy)
Tapping winkey+c on computer boot. (Pencet winkey/tombol yg gambar windows/jendela + tombol c pada saat booting awal)
Semoga bermanfaat.
Sumber : https://community.acer.com/t5/S-and-R-Series-Laptops/Acer-aspire-s7-392-9439-default-boot-device-missing-or-boot/td-p/298830
Adding a TCP/IP Route to the Windows Routing Table
The Routing table dictates where all packets go when they leave your system. On most environments, all packets that leave your system will be forwarded over to your router or hub, and from there out to the internet.
In some circumstances, you may have a testing network configured to duplicate another environment, or you may be configuring a more complex network topology that requires the use of additional routes. Adding routes to your machine is a useful testing tool for some of these situations.
For example, if you were on the 192.168.1.0 network, and you had a gateway on 192.168.1.12 configured to access the 10.10.10.0/24 network, you would use a route add statement like this:
The world of the Vikings is brought to life through
the journey of Ragnar Lothbrok, the first Viking to emerge from Norse
legend and onto the pages of history - a man on the edge of myth.