Mau video anda ditayangkan disini?? Chat with Us!!!

Monday, December 16, 2013

Shutdown/Wake Up Lan - Turn your PC On/Off


Shutdown/Wake Up Lan - Turn your PC On/Off

Shutting down the computer is an important step in its day-to-day functioning. Sometimes it may not be possible to physically shut down a computer. In such a scenario it is possible to shut down the computer remotely, provided it is connected with another computer over a network. The other two basic pre-requisites are to know the username and password, along with the firewall settings. One way of doing this is using the command prompt to input the shutdown command. The other option is to use software like WakeOnLan. This process works with Windows based systems.
 

With the Shutdown command

Prerequisites

For this method, you must share the same local area network (LAN) as the target computer. You also need to know the user name and password of the target computer.

Port 445

Find out if TCP port 445 is open in the target computer's Windows firewall:
  • Go to Start/Settings/Control Panel/Security Center
  • Then click on Windows Firewall and then the Exceptions tab
  • Normally there a line "File Sharing and printers", select it and press OK
  • If you do not see the line, click on Add Port and choose TCP port 445
  • Then go to Start/Settings/Control Panel/System and, in the Remote tab, check Allow users to connect remotely to this computer

Command line

Net use command

To obtain the necessary rights to run a shutdown command on the target machine, you must first run the net use command. Remember to note down the address of the target machine, it will be needed for the command.
  • Go to Start/Run or use the keyboard shortcut: Windows + R
  • Type cmd and hit OK
  • A DOS window (command prompt) will appear - enter the following command: net use \\ip_target_machine

Enter an administrator username/password for the target computer

Shutdown command

From now on we will implement the shutdown command.

The command is as follows:

shutdown -s -f -t 30 - m \\192.168.3.4
  • -s: Turns the computer off. (Required)
  • -f: Force running applications to close without warning.
  • -t xx: Set a countdown in seconds
  • -m \\xxx.xxx.xxx.xxx : the IP address of the target computer.


The GUI is available by typing: shutdown -i
  • For help on this command, type: shutdown /?
  • Software for this purpose can be found here: web
  • In our example, the target computer will receive instructions to shutdown in a 30 seconds delay

Using WakeOnLAN

WakeOnLan, as the name suggests, is a tool that can turn a computer on remotely over the network by sending a magic packet to the network adapter.
  • Warning: Not all network cards and BIOS are compatible or support the use of Magic Packet.

Prerequisites

For this method you need to share the same local area network (LAN) that the target computer. You also need to know the Physical Address (MAC) and the IP address of the target computer.

MAC & IP

First, you must retrieve the IP address and MAC address of the target computer:
  • Go to Start/Run or use the keyboard shortcut: Windows + R
  • Type cmd and hit OK
  • A DOS window (command prompt) will appear, enter the following command: ipconfig /all
  • In Red: The MAC address
  • Green: The IP address

Network Card

  • To check if your network card is compatible, follow these steps:
  • Right click on My Computer and click Manage
  • Go to Device Manager/Network Cards
  • Right click on your Network Card then Properties
  • Search for the following the words: "Magic Packet", "Wake On Magic Packet", "Wake On Lan" or "Wake" - verify that all options related to these words are being activated
  • If you found nothing, you may be required to update the drivers of your NIC
  • Restart the target computer

BIOS

  • To check if your BIOS is compatible, follow these steps:
  • Enter the BIOS when you start the computer by pressing ESC, F2, F5, F12 or DEL, depending on your system,
  • Once in the BIOS, go into options (POWER) and enable Wake-On-LAN, or any similar option.

Firewall

  • Open port 8900 in the same way as port 445

Wake On Lan (WOL)

  • Start by downloading the tool on the source computer
  • It is available here
    • Here's how it looks:
  • Complete the fields from the information gathered above:
    • Mac Address: MAC address (the target machine)
    • Internet Address: Local IP address (target machine)
    • Subnet Mask: 255.255.255.255
    • Send Options: Local Subnet
    • Remote Port Number: 8900
  • Click the button: Wake Me Up


Note: Once the packet has been received, the target computer should turn on.

credits to: http://en.kioskea.net/faq/9200-shutdown-wake-up-lan-turn-your-pc-on-off

Tuesday, November 19, 2013

Cara bikin GWARNET di rumah.


Spoilerfor SCRIPT:

reg export HKCU\Software\Gemscool\Premium gnet.reg
pause


Spoilerfor BUAT SCRIPT EXPORT REG KEY GWARNET:


D. nah kalo udah disimpen di FD colok tu di komputer NET lalu jalanin script nya. tar ada file otomatis kesedot ke FD agan dengan format .REG liat gambar aja gan

Spoilerfor BACKUP REG KEY GWARNET:

kalo FD gak diijinin masuk agan bisa catet aja reg key nya di HP/BB/pake kertas. klik kan di file "gnet.reg" yang barusan nongol itu. pilih edit ,tampilan nya kaya gini.
Spoilerfor hasil backup registry:

Windows Registry Editor Version 5.00

[HKEY_CURRENT_USER\Software\Gemscool\Premium]
"key"="D59F9B89-67A4-41A1-9658-569FCF9317gB"

nanti di pc rumah ketik persis pake notepad,lalu simpen dengan format .reg misal "gnet.reg" <pake tanda petik loh. biar otomatis extensi yang kesimpen jd file .reg
E. catat mac address juga. start run ketik cmd enter ketik ipconfig /all tekan enter

Spoilerfor dapetin mac address:


F.Pulang kerumah buka file reg tadi yang didapat dari Gwarnet.

Spoilerfor install reg key gwarnet:


G.Ganti mac address mu sesuai dengan mac dari gwarnet tadi.
tutor ada dibawah ini!! klik
H. cobain login ke game dari gemscool. dah dapet buff apa belom

Monday, November 18, 2013

How To: Wake on LAN / Wake on WAN

How To: Wake on LAN / Wake on WAN

Introduction

What is Wake On LAN? Wake on LAN, or WOL, is the ability to send a signal over a local area network (LAN) to power up a PC. Wake on WAN is the ability to send that same signal over a wide area network (WAN), such as the Internet, to trigger power-up of a PC on a private LAN.
Perhaps you have a PC at home that you don't want to leave powered on, yet may need to access while at work. Maybe you saw Al Gore's video, and you want to conserve energy and leave your PC off except when you need it. Certainly, your PC is more secure from hackers when it is off.
In order to take advantage of Wake On LAN/WAN technology, there are multiple steps to perform. This guide lists those steps, covering BIOS configurations, software, testing, routing, and security. The goal here isn't to cover every aspect of Wake On LAN/WAN technology, but to provide understanding and tools to make it work on your network.
You'll notice that testing comprises multiple steps in this guide. I can't emphasize enough the importance of making one change at a time, and then testing the effectiveness. Trust me, you'll thank yourself later for your patience and attention to detail now. I have been involved in far too many network changes that had to be completely re-done due to poor testing and methodology. If you check your work at each step, you can avoid doing it all over again later.
To find your way through all the options, it's helpful to reference the OSI model for computer networking. As you can see in Figure 1, the OSI model specifies seven layers. WOL plays primarily in Layers 1-4.
Figure 1: A chart showing the OSI model
(CCNA Intro Exam Certification Guide, Cisco Press, 2004, Wendell Odom, p34)
At Layer 1, (the Physical layer) both the PC to be turned on and the PC sending the WOL signal need to use wired Ethernet connections.
At Layer 2, (the Data Link layer) WOL uses MAC (Media Access Control) addresses to turn on a specific PC. The MAC address is critical, as a PC in the off condition doesn't have an IP address. IP addresses are loaded in memory, whereas MAC addresses are burned into the card.
The frame sent to the target PC carries a special datagram, called a "magic packet", which triggers an Ethernet card (NIC) to power up a PC. A WOL packet sent over the Internet will hit your router first. Your router will take the packet, strip the WAN IP, and send the packet to the Layer 2 MAC address on your LAN.
It's important to note that WOL doesn't work over wireless networks. Although both wired and wireless networks use MAC addressing, the format of a wireless frame is different than the format of a wired frame. Specifically, there is additional information carried in the header of a wireless frame that interferes with the magic packet frame, preventing the target machine from detecting the wakeup signal.
At Layer 3, (the Network layer) WOL works best when directed at a broadcast address. The broadcast address in most home and small business LANs ends in .255. For example, a gateway router with an IP address of 192.168.1.1 will typically have a broadcast address of 192.168.1.255.
This guide assumes your LAN uses a private IP address space, such as 10.x.x.x, 172.16.x.x, or 192.168.x.x. Typically, you'll have a gateway router providing NAT (Network Address Translation) through the public IP address provided by your ISP.
The challenge at Layer 3 (which handles IP addresses) is transmitting a Layer 2 frame, destined for a private IP broadcast address, across the Internet. Private IP addresses are not transmitted across the Internet, and broadcasts are often blocked.
The solution lies in Layer 4, the Transport layer. This layer specifies transport type (TCP or UDP) and port numbers. Communication across an IP network, the Internet included, uses both IP addresses and ports. Successfully transmitting a WOL signal over the Internet requires knowing the UDP port used by your WOL utility, and forwarding that port through your firewall.
Below are eight steps to follow to enable Wake On LAN/WAN technology on your network. Before you start, it will be helpful to have a solid understanding of your LAN and its elements. Taking the time to map and document the details of your network will come in handy. Even a small LAN of a half-dozen nodes has numerous key details, including subnet information, DHCP settings, MAC addresses, installed OS's, router configurations, etc.

Step 1 - Enable Wake on LAN

Most motherboards today have a built in NIC and support Wake on LAN functionality. You'll have to go into the BIOS Power Options to enable it. The process is different in each motherboard, but pretty straightforward.
On an Intel CPU ASUS P4C800 board, the option is called Power On By PCI Devices in the APM (Advanced Power Management) menu. On an AMD CPU MSI K8N board, the option is called Resume by MAC LAN.
Figure 2 below is screen shot from a laptop BIOS. You can see the option is called Power Management and there is a selection for Wake on LAN.
Figure 2: A view of a laptop BIOS
If you're using a separate PCI LAN card, you'll have to enable WOL functionality for PCI devices in your BIOS. Note that if you're using an older motherboard with a PCI 2.1 or older bus, you'll likely need to connect a 3-pin WOL cable from the NIC to the motherboard. This cable is typically not needed in newer computers using a PCI 2.2 or newer bus.
Finally, check the Advanced Properties of your network card. In Windows, go to Start-Settings-Network Connections to ensure Wake functionality is enabled. An example is shown below in Figure 3.
NIC Properties
Figure 3: The Advanced Properties tab of the NIC properties

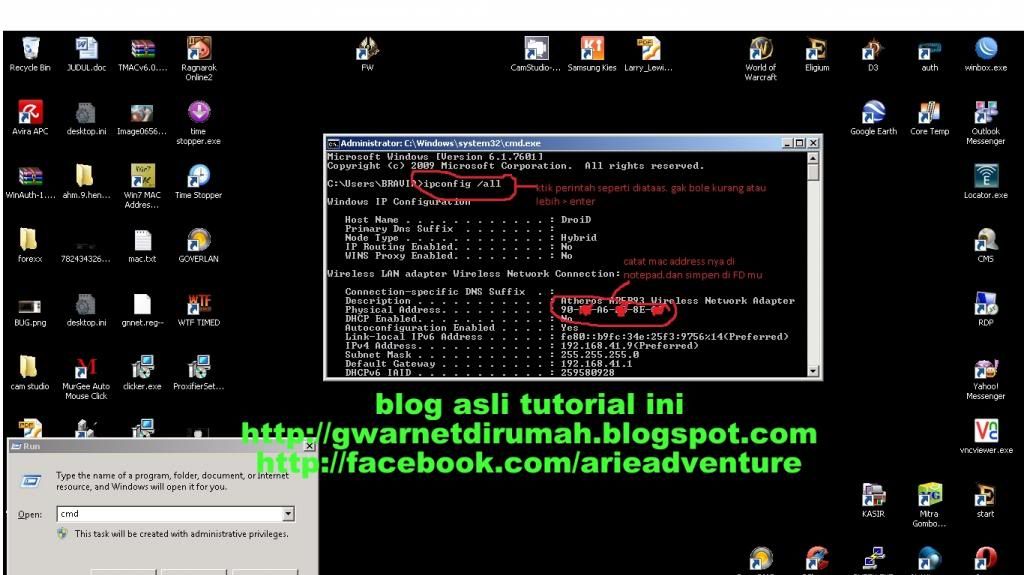
Step 2 - Collect your MAC address

From the PC on which you want WOL functionality, go to the command line (Start-Run-cmd) and type ipconfig /all. This will tell you the IP and MAC of the NIC you want to receive the WOL signal.
It's handy to store this information in a file you can access from the PC you'll be using to power up the target PC. The MAC address will be the Physical Address in the form XX-XX-XX-XX-XX-XX. In the below example in Figure 4, the Physical Address is shown as 00-12. I deleted the rest of it; normally, you'd see the full six sets of characters. A sample MAC looks like this: 00-01-02-55-77-B3.
Figure 4: The results of the "ipconfig /all" command
Step 3 - Download and install software
There are a lot of useful utilities for WOL. The intent of this guide isn't to review or recommend software, but to show you how to make it work.
I use two WOL utilities, mc-wol.exe, and AMD's Magic Packet Utility. I like the AMD Utility (www.amd.com/us-en/assets/content_type/utilities/magic_pkt.exe) as it allows for creating and saving a file of target PC MAC addresses. This comes in handy, allowing you to fire up the application, open your file, grab the MAC, and power up.
The other tool I find invaluable for network troubleshooting is Ethereal, now known as Wireshark (www.wireshark.org). These three tools are freeware and easy to use.

Step 4 - Test your configurations!
When making changes to your network, you can't be too thorough. Make one change at a time, and test each one from controlled scenarios as much as possible. Turn off your PC while at home and test WOL to watch the PC turn on!
mc-wol.exe is a simple DOS based utility and works well over the LAN. Using another PC on the same LAN as the target PC, start up the command line and go to the directory where you saved the mc-wol.exe utility. From the command line, execute the application with the MAC as its argument. For example: MC-WOL 00:01:02:55:77:B3 Note that the command and MAC address aren't case-sensitive, so you can skip the shift key.
You should observe the target PC powering up almost instantly upon hitting enter. If not, stop here and go back to Step 1. WOL won't work over the WAN if it doesn't work on the LAN. Measure, in seconds, the amount of time from power-up to boot completion. Knowing this will make the wait when you've sent a WOL signal easier.

Step 5 - Configure your router
There are two parts to WOL router configuration: optional and required changes. We'll discuss the optional configurations here.
To send a WOL signal over the Internet to your LAN, you need to know your Public IP. Unless you're paying extra for a static public IP, your ISP can change your public IP address whenever it wants, often when you reboot your router.
Dynamic DNS is a free and useful way to keep track of your Public IP address. If you have a Linksys or D-Link router, odds are that it has Dynamic DNS (DDNS) functionality. Both work with a free public website, www.dyndns.org. Set yourself up with a free account and you'll have a fully qualified domain name that won't change, even when your ISP changes your IP.
Enable DDNS and enter your account information into your router, and your router will keep your IP tied to your new domain name. There are other Dynamic DNS services that also work.
If your router doesn't support Dynamic DNS, you can download a PC-based client from Dynamic DNS to allow a PC on your LAN to keep your public IP associated with your domain. However, your domain can't be updated if your IP changes while your computer is turned off.
Static DHCP is a useful router configuration for a PC that you want to work with remotely. I like this better than setting a static private IP. Static DHCP lets your PC synch with the router and get the correct DNS information, saving the hassle of configuring it on the PC. Most routers allow you to specify a MAC address and assign it an IP address. When properly configured, your PC will now always have the same IP, but get the current and correct DNS IPs. Further, your router will have the MAC address of the target PC stored in its config.
Set up your router to allow for remote login. This is a security concern, but it comes in handy while troubleshooting your home LAN remotely.
Ping is a very powerful tool that is very useful for troubleshooting. The default setting on router and PC firewalls is to disable ping or echo replies. Having this functionality enabled helps verify the reachability of your LAN and PC.
Many routers have the ability to perform simple diagnostics, including a ping test, similar to what's shown in Figure 5. If your PC firewall allows pings, it will come in handy when you're trying to see if your PC is on or off. Familiarize yourself with this aspect of your router. It is useful to be able to log into your home router remotely and ping your target PC.
Figure 5: A router ping test
Last, if your router has a logging capability, you can use it to see if your WOL packets are hitting your router and being forwarded to your LAN. It's definitely a feature that you'll find useful if there are issues.

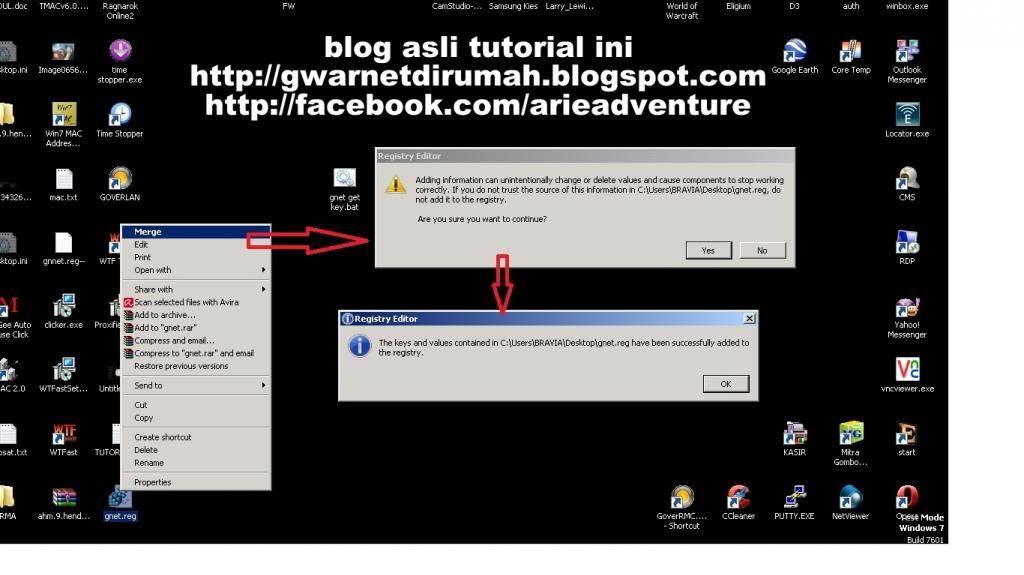
Step 6 - Configure port forwarding

Configuring port forwarding on your router is a required change; WOL won't work without it.
WOL uses UDP as its Layer 4 transport, but the port varies based on the utility. The mc-wol.exe utility uses UDP port 65535. AMD's Magic Packet Utility uses UDP port 2304. There is a Linux tool, aptly named wakeonlan, that uses UDP port 9.
An easy way to find the port is to use a packet sniffer utility to see which port is used. Ethereal (now Wireshark) is probably the best known, and a very powerful free download. If you're into networking, it is an invaluable troubleshooting tool. You may find this tool comes in handy if you're using a different WOL utility and need to find the port number.
Figure 6 below is the Wireshark capture of a WOL packet. The areas titled MAC ADDRESS and IP Address are blanked out in the example, because you'll see your own MAC and IP addresses when you run it. The key is the Dst Port (Destination Port). This is what you're looking for.
Figure 6: Wireshark's packet capture showing the destination port
Once you have the port number, you have what you need. You'll need to go into your router's port forwarding menu and set up a rule to forward UDP packets sent to the WOL port to the broadcast IP address of your LAN.
Some routers don't allow broadcast IPs to be used as a target IP. This is where having Static DHCP comes in handy. If you have configured Static DHCP, and your router has the MAC of your target PC, you can configure your router to forward the WOL packet directly to the IP address of the target PC.
Figure 7 below is a screen shot from a Linksys RV042 router. Port forwarding is configured in the Setup menu under the Forwarding tab.
Figure 7: Setting up port forwarding on a Linksys RV042 router
Figure 8 below is a screen shot from a Zyxel P-334WT router with several port forwarding rules configured. Port forwarding is configured in the Network menu under the NAT-Port Forwarding tab.
Figure 8: Setting up port forwarding on a Zyxel P-334WT router


Step 7 - Test again!

Now that you think you've configured everything, test it. Start with ensuring you can access the target PC. If you can ping from your router, double-check and ping your target PC.
Now you've reached the moment of truth. Turn the target PC off. You can remotely turn off a Windows PC via Remote Desktop Connection by right-clicking the menu bar and selecting Task Manager. You'll see a Shut Down option similar to Figure 9.
Task Manager Shut Down option
Figure 9: The Shut Down option on the Task Manager
Other OSes have similar options. Many Linux distributions have a power button at the top right, similar to Figure 10.
Linux power button
Figure 10: The power button on a Linux distribution
Okay, the PC is off. You can double-check that by sending a ping from your router to the target PC.
Now send the WOL signal to the target PC. If using the AMD Utility, you'll enter your Dynamic DNS domain, or Public IP, and the MAC address of the target PC, as in Figure 11 below. Note the time in seconds and reference the measured time—from power-up to fully booted—you previously recorded. You'll be glad you collected this as you wait the endless seconds before you can remotely login.
Sending the WOL signal
Figure 11: Sending the WOL signal
If you can log in, congratulations! You've remotely powered up a PC. If not, now is the time to start utilizing the tools discussed previously.
Leveraging the tools in your router, especially ping and log functionality, will help you find a problem. Start by looking at the log of your router. See if it received a packet from your remote PC and forwarded it per the rule you configured.

Step 8 - Security is important

Powering up a PC remotely, opening ports on your firewall, enabling remote login, and enabling ping capabilities all expose your PCs and network to the world. It's up to you how you manage that risk. For example, you can turn off ping capability on your router and disable your port forwarding rules. If you have enabled remote login to your router, you can then turn on the ping and forwarding rules when you need to power up a PC, and turn them off when you don't.
Regardless of OS, you need to set up the PC you subject to WOL to require a username and password for remote login. Windows Remote Desktop Connection is a useful way to remotely access a PC, and should be set up with a username and password. VNC software should always be configured to require a password on remote login.
Use secure passwords. Change the passwords on your router and PCs to unique, 8 or more character mixtures of uppercase and lowercase alphanumeric characters.
Test it at home before you leave your house with your PC off, hoping to turn it on remotely. Then, test it remotely with someone else at home to turn on your PC if WOL isn't working.
When all is said and done, you'll have a pretty cool solution: the ability to remotely fire up your PC with a keyboard from anywhere on the Internet. Plus, you'll save money and electricity by leaving your PC off when you don't need it.

Thursday, November 7, 2013

Barcelona vs AC Milan 3-1 All Goals & Match Highlights Champions League match 7/11/2013

Barcelona vs AC Milan 3-1 All Goals & Match Highlights Champions League match 7/11/2013

Full Download Barcelona vs AC Milan 3-1 All Goals & Match Highlights Champions League match 7/11/2013

Free Download Barcelona vs AC Milan 3-1 All Goals & Match Highlights Champions League match 7/11/2013

Watch Barcelona vs AC Milan 3-1 All Goals & Match Highlights Champions League match 7/11/2013


Download Link (IDWS):
» Download MP4 « - 05:25 min


Napoli vs Marseille 3-2 All Goals & Match Highlights Champions League match 7/11/2013

Napoli vs Marseille 3-2 All Goals & Match Highlights Champions League match 7/11/2013

Full Download Napoli vs Marseille 3-2 All Goals & Match Highlights Champions League match 7/11/2013

Free Download Napoli vs Marseille 3-2 All Goals & Match Highlights Champions League match 7/11/2013

Watch Napoli vs Marseille 3-2 All Goals & Match Highlights Champions League match 7/11/2013


Download Link (IDWS):
» Download MP4 « - 02:31 min


Borrusia Dortmund vs Arsenal 0-1 All Goals & Match Highlights Champions League match 7/11/2013

Borrusia Dortmund vs Arsenal 0-1 All Goals & Match Highlights Champions League match 7/11/2013

Full Download Borrusia Dortmund vs Arsenal 0-1 All Goals & Match Highlights Champions League match 7/11/2013

Free Download Borrusia Dortmund vs Arsenal 0-1 All Goals & Match Highlights Champions League match 7/11/2013

Watch Borrusia Dortmund vs Arsenal 0-1 All Goals & Match Highlights Champions League match 7/11/2013


Download Link (IDWS):
» Download MP4 « - 09:28 min


Chelsea vs Schalke 3-0 All Goals & Match Highlights Champions League match 7/11/2013

Chelsea vs Schalke 3-0 All Goals & Match Highlights Champions League match 7/11/2013

Full Download Chelsea vs Schalke 3-0 All Goals & Match Highlights Champions League match 7/11/2013

Free Download Chelsea vs Schalke 3-0 All Goals & Match Highlights Champions League match 7/11/2013

Watch Chelsea vs Schalke 3-0 All Goals & Match Highlights Champions League match 7/11/2013


Download Link (IDWS):
» Download MP4 « - 01:16 min


Monday, October 28, 2013

Barcelona vs Real Madrid 2-1 All Goals & Match Highlights BBVA League match 26/10/2013

Barcelona vs Real Madrid 2-1 All Goals & Match Highlights BBVA League match 26/10/2013

Full Download Barcelona vs Real Madrid 2-1 All Goals & Match Highlights BBVA League match 26/10/2013

Free Download Barcelona vs Real Madrid 2-1 All Goals & Match Highlights BBVA League match 26/10/2013

Watch Barcelona vs Real Madrid 2-1 All Goals & Match Highlights BBVA League match 26/10/2013


Download Link (IDWS):
» Download MP4 « - 13:46 min


Manchester United vs Stoke City 3-2 All Goals & Match Highlights Premier League match 26/10/2013

Manchester United vs Stoke City 3-2 All Goals & Match Highlights Premier League match 26/10/2013

Full Download Manchester United vs Stoke City 3-2 All Goals & Match Highlights Premier League match 26/10/2013

Free Download Manchester United vs Stoke City 3-2 All Goals & Match Highlights Premier League match 26/10/2013

Watch Manchester United vs Stoke City 3-2 All Goals & Match Highlights Premier League match 26/10/2013


Download Link (IDWS):
» Download MP4 « - 16:26 min


Liverpool vs West Bromwich Albion 4-1 All Goals & Match Highlights Premier League match 26/10/2013

Liverpool vs West Bromwich Albion 4-1 All Goals & Match Highlights Premier League match 26/10/2013

Full Download Liverpool vs West Bromwich Albion 4-1 All Goals & Match Highlights Premier League match 26/10/2013

Free Download Liverpool vs West Bromwich Albion 4-1 All Goals & Match Highlights Premier League match 26/10/2013

Watch Liverpool vs West Bromwich Albion 4-1 All Goals & Match Highlights Premier League match 26/10/2013


Download Link (IDWS):
» Download MP4 « - 17:23 min


Crystal Palace vs Arsenal 0-2 All Goals & Match Highlights Premier League match 26/10/2013

Crystal Palace vs Arsenal 0-2 All Goals & Match Highlights Premier League match 26/10/2013

Full Download Crystal Palace vs Arsenal 0-2 All Goals & Match Highlights Premier League match 26/10/2013

Free Download Crystal Palace vs Arsenal 0-2 All Goals & Match Highlights Premier League match 26/10/2013

Watch Crystal Palace vs Arsenal 0-2 All Goals & Match Highlights Premier League match 26/10/2013


Download Link (IDWS):
» Download MP4 « - 13:37 min


Chelsea vs Manchester City 2-1 All Goals & Match Highlights Premier League match 27/10/2013

Chelsea vs Manchester City 2-1 All Goals & Match Highlights Premier League match 27/10/2013

Full Download Chelsea vs Manchester City 2-1 All Goals & Match Highlights Premier League match 27/10/2013

Free Download Chelsea vs Manchester City 2-1 All Goals & Match Highlights Premier League match 27/10/2013

Watch Chelsea vs Manchester City 2-1 All Goals & Match Highlights Premier League match 27/10/2013


Download Link (IDWS):
» Download MP4 « - 15:13 min


Friday, October 25, 2013

Anggapan Salah Tentang Wifi

1. Power Besar akan menghasilkan jarak yang lebih jauh.

Anggapan ini keliru besar, karena Wireless bersifat dua arah, pemancar dan penerima. Selain Daya pancar (Tx Power) yang besar, dibutuhkan juga Penerima yang sensitif (Receiver Sensitivy). Oleh sebab itu, dalam memilih sebuah Radio wireless, selain Daya pancar (dalam satuan mWatt atau dBm -> 200 mWatt = 23 dBm), di perhatikan juga Sensitifitas Penerima (Contoh: Senao 2611: -89dBm @ 11Mbps, Orinoco Gold 802.11b "Classic" -82 dBm @ 11Mbps, Linksys WRT-54GL -89 dBm @ 11 Mbps, Belkin F5D6020 -76dBm @ 11Mbps). Ini yang menyebabkan walaupun Linksys WRT-54GL dengan Firmware DD-WRT bisa di set hingga TX Power 251 mWatt tetapi daya jangkau tidak akan sejauh Senao 2611-CB3+ (Sensitifitas Penerimaan Senao unggul 9dB! artinya sama dengan perbedaan 100mWatt dengan 800mWatt, sedangkan pada power 251mWatt Linksys WRT-54 membawa Noise level yang cukup tinggi)

2. Booster (penguat daya) akan selalu menambah jarak jangkau

Sama dengan butir 1, tidak selamanya besar. Menambah daya pancar dengan booster, juga akan memperkuat Noise. Seringkali dengan penambahan Booster sebaliknya akan memperpendek jarak jangkau. Yang perlu diperhatikan adalah Rasio Sinyal terhadap noise (S/N/ ratio), yang harus dipertinggi adalah Rasio Sinyal terhadap Noise. Oleh karenanya, lebih baik meningkatkan Penguatan (Gain) antenna (karena bersifat resiprokal: Pancar dan Terima)dan relatif tidak memperbesar Noise.

3. Antena Omni 15 dB akan memiliki jarak jangkau yang sama dengan Antena Directional 15 dB

Dalam hal di udara tidak ada pengguna lain (frekuensi benar-benar kosong), hal ini berlaku. Tapi dalam kondisi umum, di mana penggunaan frekuensi sudah sangat padat, Antena Directional akan jauh lebih baik, karena beamwidth yang lebih sempit.

4. Radio wireless dengan merk yang sama akan memberikan kinerja yang lebih baik

Yang menentukan kinerja sepasang Radio Wireless adalah spesifikasi Chipset yang digunakan (Misalnya: Atheros, Prism/Conexant, Broadcom, Ralink dll)dan algoritma Firmware yang digunakan (Firmware adalah Software yang ditanam dalam Chipset). Sering terjadi dalam Merk dan Tipe yang sama, sebuah Radio menggunakan Chipset yang berbeda (Contoh: dLink DWL-G510 versi B1 menggunakan Atheros, sedangkan versi C1 yang sekarang beredar di pasaran menggunakan Ralink). Radio yang memiliki Chipset yang sama DAN Firmware yang sama akan memberikan kinerja terbaik.

5. Semakin tinggi antenna dari tanah akan semakin baik

Tidak selamanya benar. Antena Pemancar dan Penerima akan maksimal jika berada pada fokus beamwidth. Pada setiap rancangan Antena terdapat spesifikasi Beamwidth Vertical dan Horizontal, selebar mana (dalam derajad) penguatan akan berkurang 3dB dari titik Focus. Utamanya pada Antena Omni berpenguatan besar diatas 15dBi Beamwidth Vertical hanya setipis 5 derajad, artinya pada 5 derajad dari arah tegak lurus, penguatan akan berkurang menjadi 12 dB dstnya. Hal ini menyebabkan areal di bawah Antenna tersebut nyaris Blankspot pada saat Antena diletakkan 15-25 meter di atas tanah.

6. Semakin tinggi dBi antenna akan semakin baik

Tidak selamanya benar. Mengacu pada point 5 Antena Pemancar dan Penerima akan maksimal jika berada pada fokus beamwidth. Pada setiap rancangan Antena terdapat spesifikasi Beamwidth Vertical dan Horizontal, selebar mana (dalam derajad) penguatan akan berkurang 3dB dari titik Focus. Biasanya semakin tinggi gain antena maka semakin kecil vertikal beamwidth. Hal ini menyebabkan antena grid yg 24dBi akan lebih jelek hasilnya dibanding dengan omni 10dbi jika di akses langsung di bawah antenanya. begitupula dengan antena omni 20dBi akan lebih kecil signalnya jika diakses dengan laptop langsung di bawah tower.  sehingga pemilihan gain antena di sesuaikan dengan kebutuhanya, jika untuk hotspot dan diakses dengan laptop maka pilih antena dengan gain yg kecil. Jika untuk RT RW Net atau WISP dengan jarak yg lumayan jauh dan penerima menggunakan antena external, maka pilih gain antena yg tinggi.

sumber: antarlangit.com

Pemilihan Channel untuk Optimasi Sinyal Wireless


Media yang digunakan dalam pertukaran data pada jaringan wireless tidak sebagaimana yang ada pada jaringan kabel yang media-nya dapat terlihat dan hanya berada pada satu line. Pada jaringan wireless media yang digunakan adalah udara dengan menggunakan frekuensi, dengan media pertukaran data yang berupa udara ini tentu kita tidak dapat sepenuhnya mengontrol sebagaimana pada kabel. Interferensi atau gangguan yang ada pada wireless lebih banyak karena menggunakan media publik yang dapat digunakan oleh siapa saja.
Pada wireless 802.11 b/g/n yang menggunakan band 2.4 GHz, ada 14 chanel yang dapat digunakan. Dalam suatu area kadang sering ada banyak jaringan wireless lain selain milik kita, jika chanel yang digunakan antara satu wireless dengan wireless yang lain bersinggungan tentu  akan menimbulkan interferensi yang menyebabkan sinyal wireless kurang maksimal yang akhirnya juga berdampak pada kurang optimalnya pertukaran data pada jaringan wireless tersebut. Berikut representasi grafik pada wi-fi chanel pada band 2.4


Penggunaan wi-fi chanel yang tidak tepat dapat menimbulkan interferensi, sebagai contoh jika jaringan A menggunakan chanel 6, sedangkan jaringan B menggunakan 8, maka akan terjadi  interferensi.

Oleh karena itu agar tidak terjadi interferensi maka gunakanlah non-overlapping chanel , yaitu chanel 1, 6 11 dan 14 pada jaringan wireless (Access Point) yang berbeda.


Sedangkan yang g/n dan n sebagai berikut

Untuk mendeteksi interferensi chanel yang digunakan disekitar area jaringan, salah satu tool yang powerfull, easy looking dan juga gratis adalah inSSIDer, untuk lebih jelasnya silahkan kesini atau kesini.


Sebagai contoh dari gambar di atas dapat kita lihat chanel 1 sudah crowded dan 6 telah digunakan, sedangkan chanel 11 masih belum digunakan, jika saat ini anda masih menggunakan chanel 1, silahkan berpindah ke chanel 11 yang masih kosong, atau jika ingin membangun jaringan baru gunakanlah chenel 11 yang masih belum terpakai.
Secara teori RSSI (Received Signal Strength Indication) maksimal yang bisa didapat (untuk mendapatkan sinyal wi-fi 100%) adalah -10 dBm, namun dalam prakteknya hampir mustahil untuk mendapatkan -10 dBm, dalam perconbaan saya RSSI yang didapat oleh komputer yang berada tepat disamping Access Point hanya sampai -22 dBm. Namun RSSI yang sampai di antara -10 dBm dan -30 dBm sudah termasuk Typical maximum received signal power untuk jaringan wireless.
Setelah mengetahui interferensi chanel disekitar jaringan wi-fi, sebagai administrator anda dapat mempertimbangkan chanel berapa yang seharusnya digunakan untuk mendapatkan sinyal yang optimal serta meminimalkan interferensi dengan chanel selain jaringan wi-fi milik kita. Interferensi yang terjadi sebenarnya bukan hanya berasal dari sinyal wi-fi atau access point lain, namun juga berasal dari setiap perangkat di sekitar area yang menggunakan frekuensi band 2.4 GHz.

Untuk mengganti atau mensetting chanel silahkan masuk ke konfigurasi Router atau Access Point dan carilah konfigurasi pemilihan chanel.


sumber: http://appstrack.blogspot.com

Thursday, October 24, 2013

Bayern Munich vs Viktoria Plzen 5-0 All Goals & Match Highlights Champions League match 24/10/2013

Bayern Munich vs Viktoria Plzen 5-0 All Goals & Match Highlights Champions League match 24/10/2013

Full Download Bayern Munich vs Viktoria Plzen 5-0 All Goals & Match Highlights Champions League match 24/10/2013

Free Download Bayern Munich vs Viktoria Plzen 5-0 All Goals & Match Highlights Champions League match 24/10/2013

Watch Bayern Munich vs Viktoria Plzen 5-0 All Goals & Match Highlights Champions League match 24/10/2013


Download Link (IDWS):
» Download MP4 « - 04:44 min


Bayer Leverkusen vs Shakhtar Donetsk 4-0 All Goals & Match Highlights Champions League match 24/10/2013

Bayer Leverkusen vs Shakhtar Donetsk  4-0 All Goals & Match Highlights Champions League match 24/10/2013

Full Download Bayer Leverkusen vs Shakhtar Donetsk  4-0 All Goals & Match Highlights Champions League match 24/10/2013

Free Download Bayer Leverkusen vs Shakhtar Donetsk  4-0 All Goals & Match Highlights Champions League match 24/10/2013

Watch Bayer Leverkusen vs Shakhtar Donetsk  4-0 All Goals & Match Highlights Champions League match 24/10/2013


Download Link (IDWS):
» Download MP4 « - 02:17 min


Manchester United vs Real Sociedad 1-0 All Goals & Match Highlights Champions League match 24/10/2013

Manchester United vs Real Sociedad 1-0 All Goals & Match Highlights Champions League match 24/10/2013

Full Download Manchester United vs Real Sociedad 1-0 All Goals & Match Highlights Champions League match 24/10/2013

Free Download Manchester United vs Real Sociedad 1-0 All Goals & Match Highlights Champions League match 24/10/2013

Watch Manchester United vs Real Sociedad 1-0 All Goals & Match Highlights Champions League match 24/10/2013


Download Link (IDWS):
» Download MP4 « - 05:57 min


Real Madrid vs Juventus 2-1 All Goals & Match Highlights Champions League match 24/10/2013

Real Madrid vs Juventus 2-1 All Goals & Match Highlights Champions League match 24/10/2013

Full Download Real Madrid vs Juventus 2-1 All Goals & Match Highlights Champions League match 24/10/2013

Free Download Real Madrid vs Juventus 2-1 All Goals & Match Highlights Champions League match 24/10/2013

Watch Real Madrid vs Juventus 2-1 All Goals & Match Highlights Champions League match 24/10/2013


Download Link (IDWS):
» Download MP4 « - 04:17 min


Benfica vs Olympiakos 1-1 All Goals & Match Highlights Champions League match 24/10/2013

Benfica vs Olympiakos 1-1 All Goals & Match Highlights Champions League match 24/10/2013

Full Download Benfica vs Olympiakos 1-1 All Goals & Match Highlights Champions League match 24/10/2013

Free Download Benfica vs Olympiakos 1-1 All Goals & Match Highlights Champions League match 24/10/2013


Watch Benfica vs Olympiakos 1-1 All Goals & Match Highlights Champions League match 24/10/2013


Download Link (IDWS):
» Download MP4 « - 04:11 min


Anderlecht vs PSG 0-5 All Goals & Match Highlights Champions League match 24/10/2013

Anderlecht vs PSG 0-5 All Goals & Match Highlights Champions League match 24/10/2013

Full Download Anderlecht vs PSG 0-5 All Goals & Match Highlights Champions League match 24/10/2013

Free Download Anderlecht vs PSG 0-5 All Goals & Match Highlights Champions League match 24/10/2013

Watch Anderlecht vs PSG 0-5 All Goals & Match Highlights Champions League match 24/10/2013


Download Link (IDWS):
» Download MP4 « - 01:54 min


Wednesday, October 23, 2013

AC Milan vs Barcelona 1-1 All Goals & Match Highlights Champions League match 23/10/2013

AC Milan vs Barcelona 1-1 All Goals & Match Highlights Champions League match 23/10/2013

Full Download AC Milan vs Barcelona 1-1 All Goals & Match Highlights Champions League match 23/10/2013

Free Download AC Milan vs Barcelona 1-1 All Goals & Match Highlights Champions League match 23/10/2013

Watch AC Milan vs Barcelona 1-1 All Goals & Match Highlights Champions League match 23/10/2013


Download Link (IDWS):
» Download MP4 « - 01:49 min

Arsenal vs Borrusia Dortmund 1-2 All Goals & Match Highlights Champions League match 23/10/2013

Arsenal vs Borrusia Dortmund 1-2 All Goals & Match Highlights Champions League match 23/10/2013

Full Download Arsenal vs Borrusia Dortmund 1-2 All Goals & Match Highlights Champions League match 23/10/2013

Free Download Arsenal vs Borrusia Dortmund 1-2 All Goals & Match Highlights Champions League match 23/10/2013

Watch Arsenal vs Borrusia Dortmund 1-2 All Goals & Match Highlights Champions League match 23/10/2013


Download Link (IDWS):
» Download MP4 « - 05:54 min


We are Live for Sharing, kunjungi juga www.sewaalatbayijambi.com